Welcome to this learning Rust series where we will learn Rust by building one project per article and learn each and every concept in quite some depth. This is my new Rust series and it’ll much more comprehensive than my previous Rust series. For the first 5-6 articles, the projects will be relatively simple but after that I assure you, we are going to build a ton of interesting projects and learn a lot of stuff. So, lets start with the first article
In this article, we are going to learn about Rust variables and types by building a simple scientific calculator.
Prerequisites
You should know any one programming language at least the basics of it like conditions, variables, loops, functions. The most important thing, you should have will to learn and put effort. This is going to be a long but tough journey so buckle up.
Part 1 - Installing Rust
Just like any other language, we first need to install it before we can use it, so just go ahead and follow the Rust installation instruction and come back Install Rust with rustup
After installing Rust, open a new terminal and check that the compiler is available:
rustc --versionYou should see a version similar to:
rustc 1.97.0The exact version will depend on when you install Rust.
Now check Cargo:
cargo --versionYou may be thinking what is Cargo? Cargo is Rust’s build system and package manager. We will use Cargo throughout this series.
You can also check rustup:
rustup --versionIf all three commands work, your Rust installation is ready.
Getting Started with Cargo
Before we start learning Rust, let’s quickly understand how we will create, build, and run our Rust projects throughout this series.
What is Cargo?
Cargo is Rust’s build system and package manager. It handles tasks such as creating projects, compiling code, running programs, checking code, and managing dependencies.
You will be using Cargo throughout this series, so let’s get familiar with the basic commands.
Creating a Rust Project
Let’s create our first Rust project.
Open your terminal, navigate to the folder where you want to keep your project, and run:
cargo new hello-rustCargo will create a new directory called hello-rust with a basic Rust project inside it.
Move into the project:
cd hello-rustIf you open the project in your editor, you will see a structure similar to this:
hello-rust/
├── Cargo.toml
└── src/
    └── main.rs
Let’s understand what these files are.
Cargo.toml is the project’s manifest file. It contains information about the project, such as its name, version, Rust edition, and dependencies.
src/main.rs is the entry point of a binary Rust application. This is where our main function will live.
Cargo also creates a Cargo.lock file after resolving dependencies during a build. You don’t need to worry about it yet; we’ll discuss dependency management later in the series.
Running the Project
Open src/main.rs. Cargo generates a small Hello World program for us:
fn main() {
    println!("Hello, world!");
}
We can run the program with:
cargo runYou should see:
Hello, world!cargo run first compiles the project if necessary and then runs the resulting executable.
Checking Your Code
Another useful command is:
cargo checkcargo check checks whether your project compiles without producing the final executable.
It is useful while developing because it lets you quickly check whether your code is valid without doing a complete build.
You will see me use cargo check frequently throughout this series.
Building Your Project
To compile the project, you can use:
cargo buildBy default, this creates a debug build. When you eventually want an optimized release build, you can use:
cargo build --releaseFor now, you don’t need to worry about the difference between debug and release builds. We’ll come back to that when it becomes relevant.
The Cargo Workflow
At this point, the basic workflow you need to remember is:
cargo new       → create a new project
cargo check     → check that the code compiles
cargo run       → compile and run the program
cargo build     → compile the project
That’s enough Cargo knowledge for now.
We will learn more about Cargo, dependencies, workspaces, builds, and project configuration later in the series when we actually need them.
Now that we know how to create and run a Rust project, let’s start learning Rust itself.
Variables
The very first thing that we will learn is variables in Rust. The syntax is very similar to other programming languages but still there are some differences that you should know and understand from the very beginning.
Creating a Variable
Let’s start by learning how to create a variable:
fn main() {
	let number = 10;

	println!("{number}")
}
You can run this by typing the following in your terminal:
cargo runYou should see the output 10. The line let number = 10; creates a variable binding. Let me show you with the following image:
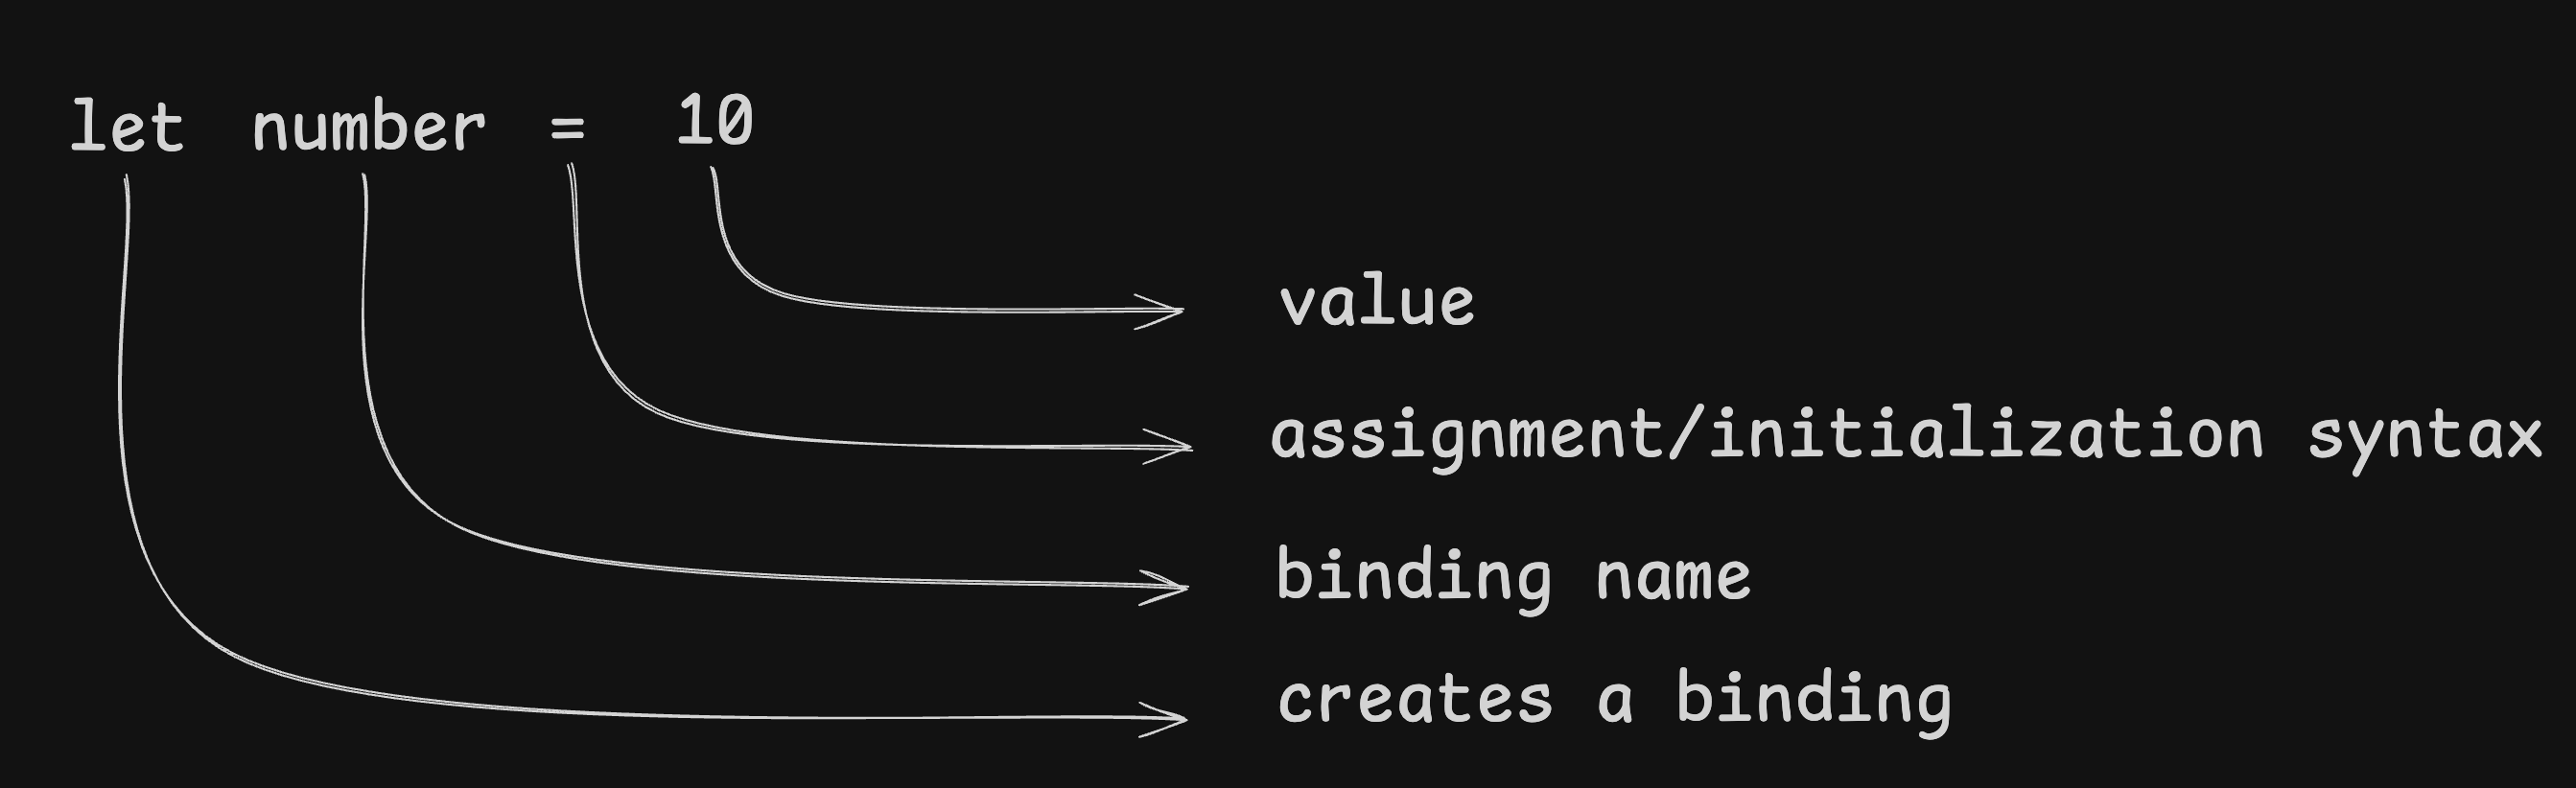
In Rust terminology, it is useful to think of let as creating a binding between a name and a value. Here, we are basically telling Rust that the name number refers to the value 10. Don’t worry about the types right now, we will learn about them shortly
Now you might be thinking that it seems very very similar to languages like JavaScript and Python, then what is the difference that I was talking about. Let me show you by explaining what are the pieces of information associated with binding:
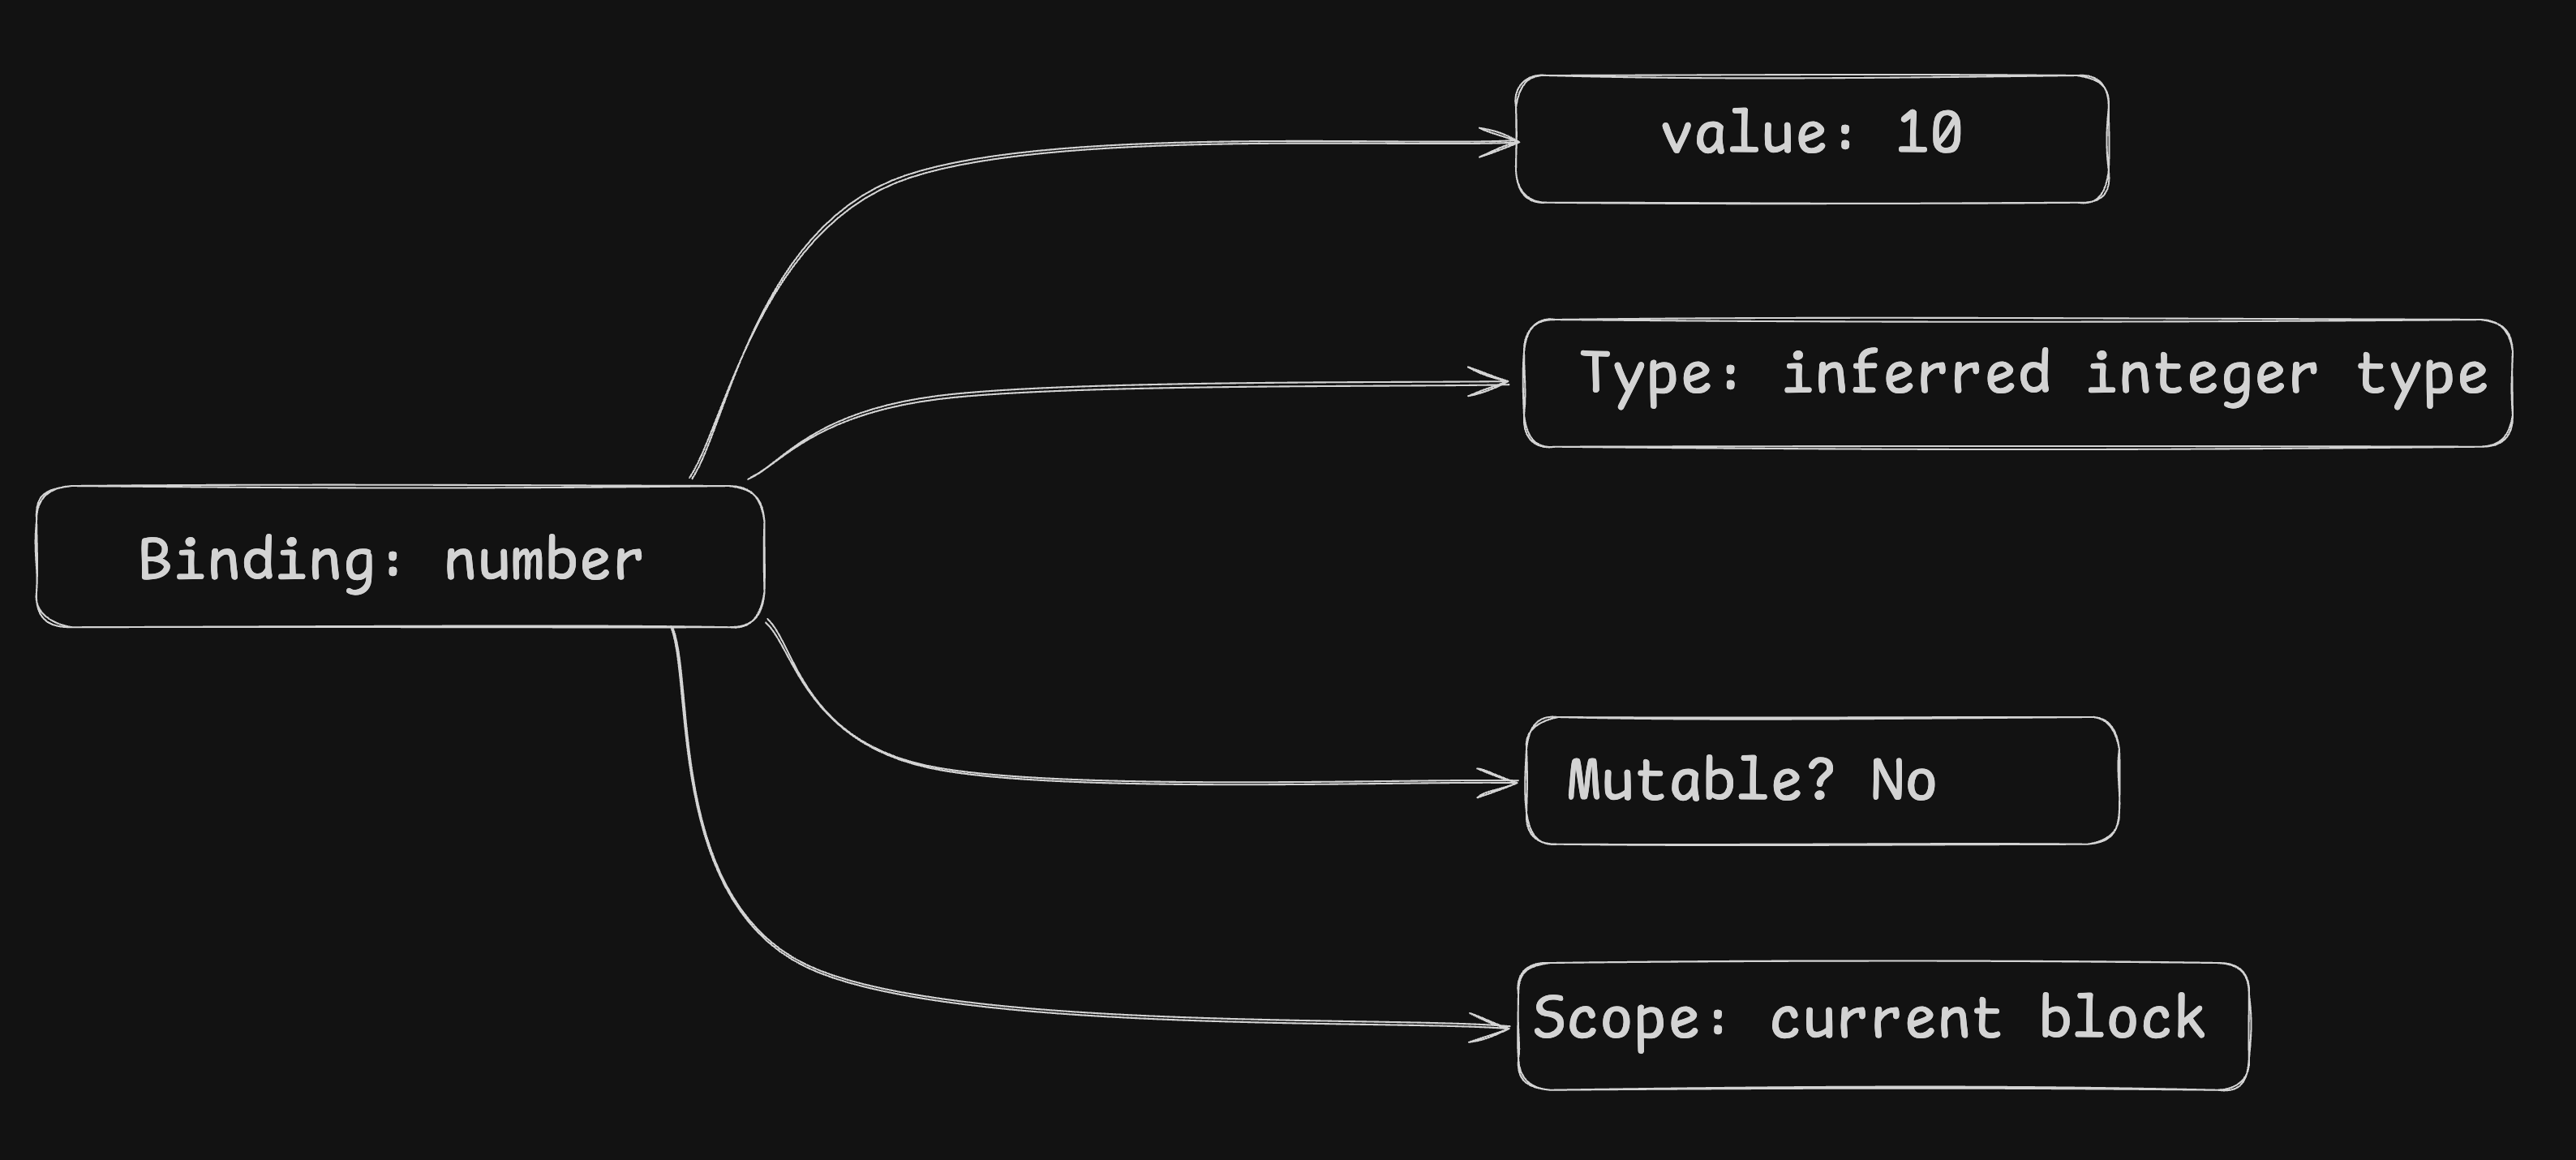 For now, you just need to note that the binding has a name called
 number and it refers to a value 10, the value has a type, the binding is immutable by default and the binding exists within a particular scope. We will comeback to these properties later in this section and the next one as well.
Variables are immutable by default
Lets try and run this program:
fn main() {
    let number = 10;

    number = 20;

    println!("{number}");
}
You will see an error saying we cannot assign to an immutable variable.
You need to remember this: bindings created with
letare immutable by default
If we want to change the value associated with the binding, we have to explicitly say that it is mutable and we do that by using the keyword mut:
fn main() {
    let mut number = 10;

    number = 20;

    println!("{number}");
}
Now run the program using cargo run and you’ll see the output 20.
For now, that distinction is enough. Ownership and borrowing will make this distinction much more important later in the series.
Reassignment
Let’s try and run this program:
fn main() {
	let mut number = 10l;

	number = 20;
	number = 30;

	println!("{number}")
}
You’ll get the output 30. We first create the binding number with value 10, then reassigned to 20 and then again reassigned to 30 and finally print number
Shadowing
In Rust, we can declare another binding using the same name, like this:
fn main() {
	let number = 10;
	let number = 20;

	println!("{number}")
}
Now, run and check the output, you’ll get the output 20. At first, this may seem like reassignment but its not. This is what we call shadowing. There is a subtle difference between reassignment and shadowing, in shadowing you can see that the second let creates a new binding that has the same name as the previous binding. In reassignment, we don’t create multiple binding with the same name.
Shadowing can also change the type as well:
fn main() {
	let value = 10;
	let value = "ten";

	println!("{value}")
}
If you’ll run this, you can see the output will be ten. If you’ll do this using reassignment, then it would fail and will show you an error:
fn main() {
	let mut value = 10;
	value = "ten";

	println!("{value}")
}
This shadowing concept will be used later in our series, so for now I’m leaving this concept here and we will pick it up in a later article to learn even more about it.
Scope
These bindings also have a scope. Scope is the region of the program in which the binding can be used. Let me show you with an example:
fn main() {
	let outer = 10;

	{
		let inner = 20;
		println!("{outer}")
		println!("{inner}")
	}

	println!("{outer}")
}
I think you must have seen this kind of scope in other languages as well. The inner binding scope only exists inside the nested block and outer binding scope exists till the end of the program. So when you run the program, once our program gets out of the nested block, the inner binding is no longer available. That’s why if you’ll try to print inner binding value outside of that nested block, you’ll get an error. Let me show you the scope of our above code with this visual:
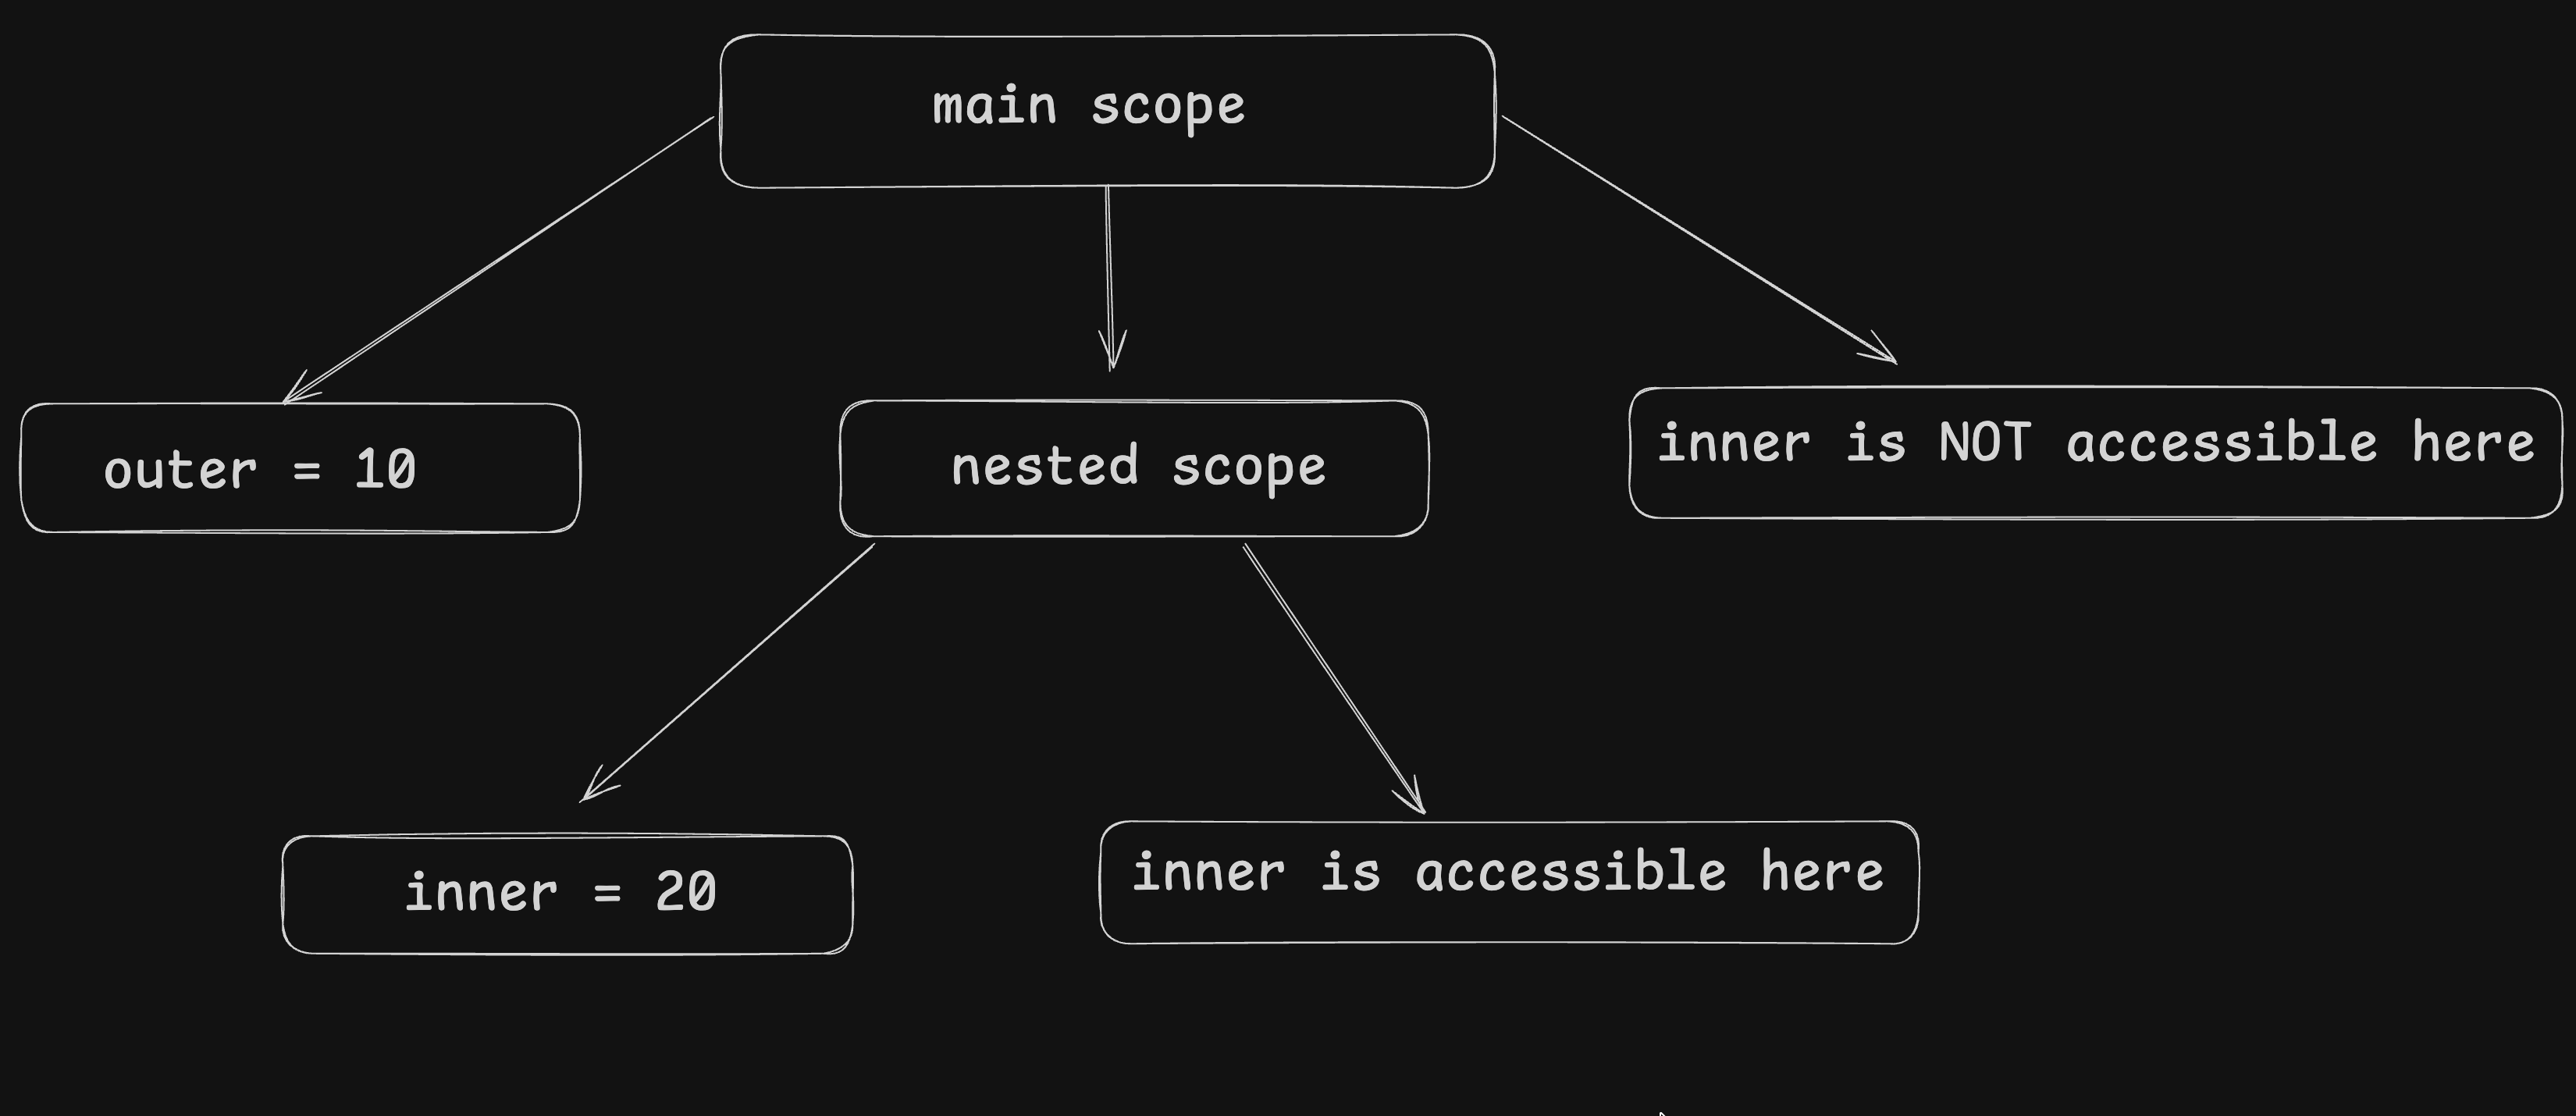 We will later understand and connect the idea of scoping with ownership and lifetime, but for now, just understand that scope is a region in which a binding is available
Where does the value actually live?
I know you may be wondering what actually happens when we write let number = 10; in a Rust program. I can give you a brief explanation now but we will dive deeper in a later article regarding this.
So, for simple values such as integers, the compiler can generally represent the value directly in machine storage often in a register or stack memory depending on how the generated code is optimised and used.
Variables are not always live on the stack. Please take the above brief statement with a pinch of salt as I’m simplifying this a lot. As I said, we will learn about this in detail in a separate article, so it would be great if you’ll be patient and for now just focus on learning the language level behaviour and not focus on machine level details.
One Last Experiment
Let’s just combine what we have learned with this program:
fn main() {
	let number = 10;

	{
		let mut number = number;

		number = 20;

		println!("{number}");
	}

	println!("{number}")
}
I would say try to guess the output first before running the program and checking the output. First, we created a outer binding number and the value is 10, then inside the nested block, we created an inner binding with the same name, this will shadow the outer number binding and the value of this inner binding is 10, then we are reassigning the value to be 20(we can do this because of mut in inner binding), then printing number would give us 20. Finally we exist out of nested block and prints number again but this time it’ll point to the outer number binding, hence printing the value 10.
I think, by now you should be comfortable with the basic variable model. Now, we can get into types
Types
Like some other languages, we have types in Rust as well. Let’s use the same example that we used first and look at the value itself:
let number = 10;We know that the number refers to 10 but the question is What kind of value if 10? This is where we will focus for the rest of the section where we will understand all the common types that Rust provides.
In general, a type tells us what kind of value it is working with and what operations are valid for that value.
Let’s start with a very basic example:
fn main() {
	let number = 10;

	println!("{number}")
}
Once you run it, you’ll see the output 10. We already know this, nothing surprising. Now, lets make its type explicit:
fn main() {
	let number: i32 = 10;

	println!("{number}")
}
This will again output 10 but in this program, we explicitly mentioned that type the value should have.
The syntax that you’ll follow to explicitly mention the type of a value is this:
let name: Type = value;So in our basic example, number is the binding name, i32 is the type and 10 is the value
What Does a Type Actually Determine?
A type determines things like what values can be represented, how operations on those values behave, which operations are valid, how values can interact with other values, how the compiler represents the value at runtime and may be something else but I think these are the most common things you should know For example, integers support operations arithmetic operations:
fn main() {
	let a: i32 = 10;
	let b: i32 = 20;

	let result = a + b;

	println!("{result}");
}
This works because i32 supports addition. But Rust does not allow arbitrary values of unrelated types to be combined. For example:
fn main() {
	let a: i32 = 10;
	let b: f64 = 20.5;

	let result = a + b;

	println!("result")
}
If you’ll run this, this will fail because Rust will see two different types i32 and f64 and the compiler will complain saying both are not the same type so can’t perform operation. We will later see how to convert a type to make this operation happen but for now just remember that performing operations on different types will fail in Rust.
Rust’s Scalar Types
In Rust, we have some primitive scalar types. The four main categories are:
| Scalar Types |
|---|
| Integers |
| Floating-point numbers |
| Booleans |
| Characters |
The integer and floating-point categories contain multiple concrete types. Let’s go over each of these types and understand a bit more about each of these types one by one
Signed Integers
A signed integer can represent both positive and negative whole numbers. In Rust, we have several variants of signed integers, these variants represents the size of the integer in bits.
| Signed Integers |
|---|
i8 |
i16 |
i32 |
i64 |
i128 |
isize |
We have different variants of signed integers because programs sometimes need different numeric ranges. For example, i8 has 8 bits and can represent -128 through 127 while i32 has 32 bits and can represent -2,147,483,648 through 2,147,483,647 and i64 can represent even more. I hope you get the idea.
Unsigned Integers
A unsigned integer (yeah, you guessed it right) can’t represent negative values. For example:
fn main() {
	let count: u32 = 100;

	println!("{count}");
}
This will work perfectly fine but if you’ll replace that 100 with any negative number like this:
fn main() {
	let count: u32 = -100;

	println!("{count}")
}
Now, if you’ll try to run it, compiler will complain because the range of u8 is 0 through 255 and that’s why negative numbers are not valid.
usize and isize
There are two integer types that I want you to give your special attention: usize and isize. Unlike i32 or u64, their size depends on the target architecture. For example, on a 64-bit system: usize is 64 bits and isize is 64 bits but on a 32-bit system: usize is 32 bits and isize is 32 bits. usize is very commonly used when working with sizes and indexes. You’ll frequently see ti later when we work with collections. We will see the usage of usize in a later article, for now I just want you to understand the gist of it and I hope you do.
Floating Point Types
As we are building a mini scientific calculator, we obviously need decimal value support and to support that Rust provides two floating-point types: f32 and f64
Let me show you a basic example for floating point as well:
fn main() {
	let a: f32 = 10.5;
	let b: f64 = 20.5;

	println!("{a}");
	println!("{b}");
}
Boolean
Rust supports boolean type as well and its represented with bool. It has exactly two possible values: true and false. Let me give you a basic example:
fn main() {
	let is_running: bool = true;
	let is_finished: bool = false;

	println!("{is_running}");
	println!("{is_finished}");
}
Character
Rust also supports character type and its represented by char keyword. A char represents a single Unicode scalar value. For example:
fn main() {
	let letter: char = 'R';
	let symbol: char = '😀';

	println!("{letter}");
	println!("{symbol}");
}
Remember that, we are using single quotes when we are defining a character. If you’ll use double quotes, then it’ll become a string literal. These two are different types.
So, from the above example, you can see that a Rust char can represent Unicode scalar values and this is the reason you should not think of char as “one byte”. Rust’s char is a four-byte type representing a Unicode scalar value.
Type Inference
In the beginning, we were not writing types for our variables but recently we started explicitly mentioning the types of our variables. That means, Rust does not require us to annotate every variable, Rust will infer the type and this is called type inference. Type inference doesn’t mean that a variable has not type. that variable still has a concrete compile-time type. Its just that Rust has simply determined that type for us. We can also verify this theory with an example:
fn main() {
	let number = 10;

	println!("{}", std::any::type_name_of_val(&number));
}
You should see the output as i32.
Numeric Literal Suffixes
Rust allows us to attach a type suffix to a numeric literal. This is just another way of making type explicit.
fn main() {
	let a = 10_i32;
	let b = 10_i64;
	let c = 10.5_f64;
}
The suffix tells Rust what type the literal should have. So, 10_i64 means the integer literal 10 should have type i64. The first way that we learned uses type annotation on the binding and this one uses a type suffix on the literal.
Rust Does Not Implicitly Convert Numeric Type
Let’s go back to the example that we used earlier:
fn main() {
	let a: i32 = 10;
	let b: f64 = 20.5;

	let result = a + b;

	println!("{result}");
}
If you’ll run this, this will fail because you are trying to do operation with two different types. To make it run successfully, we need to convert one of these two types and make both the types same:
fn main() {
	let a: i32 = 10;
	let b: f64 = 20.5;

	let result = a as f64 + b;

	println!("{result}");
}
With that as f64, we converted the integer a to f64 and now the operation can happen. We will learn more about type conversion later in the series.
Building The Scientific Calculator
From now on, we are going to build our calculator incrementally. I hope you have installed Rust already, if not please go to the top of this article and get the Rust installation link and follow the instructions. Once done, come back and start working on this project.
Create the project
Just open your terminal, go to your preferred folder where you want to create this project and then lets create a new Cargo project:
cargo new scientific-calculatorThen open this project in your preferred IDE. I’ll be using Zed IDE Once you open the project, you’ll see this folder structure:
scientific-calculator/
├── Cargo.toml
└── src/
    └── main.rs
For this project, we don’t need to modify Cargo.toml as we will only use Rust’s standard library
Now, open src/main.rs and you’ll see there is a Cargo generated hello world program, let’s replace that and print Scientific Calculator:
fn main() {
	println!("Scientific Calculator");
}
Once you run it with cargo run, you should see Scientific Calculator on your terminal.
Add the Four Basic Operations
Let’s add all the four basic arithmetic operations:
fn main() {
    let a: f64 = 20.0;
    let b: f64 = 6.0;

    let addition = a + b;
    let subtraction = a - b;
    let multiplication = a * b;
    let division = a / b;

    println!("Addition: {addition}");
    println!("Subtraction: {subtraction}");
    println!("Multiplication: {multiplication}");
    println!("Division: {division}");
}
If you’ll run this, you’ll see that all the operations are working fine but formatting for division is missing. We will deal with that later.
Add our First Scientific Operation
Lets add square root, power, trigonometric operations:
fn main() {
    let a: f64 = 20.0;
    let b: f64 = 6.0;

    let addition = a + b;
    let subtraction = a - b;
    let multiplication = a * b;
    let division = a / b;

    let square_root = 25.0_f64.sqrt();
    let power = 2.0_f64.powi(8);
    let sine = 0.0_f64.sin();
    let cosine = 0.0_f64.cos();

    println!("Addition: {addition}");
    println!("Subtraction: {subtraction}");
    println!("Multiplication: {multiplication}");
    println!("Division: {division}");
    println!("Square root: {square_root}");
    println!("Power: {power}");
    println!("Sine: {sine}");
    println!("Cosine: {cosine}");
}
Now, its looking a bit better but there is still one problem, the inputs are hardcoded, we need a way to take input from user. Let’s work on that next.
Reading Command Line Arguments
To read user inputs, we can read command line arguments and Rust provides std::env::args for accessing the arguments passed to a program. For now, lets not worry about parsing numbers or performing calculations. Lets first look at what are we receiving from the arguments through command line:
Comment out the complete main.rs code and then write this code:
fn main() {
	let args = std::env::args();

    println!("{:?}", args);
}
Now run:
cargo run -- add 10 20You should see output representing the arguments passed to the program. However, args is an iterator, and printing it directly isn’t particularly useful for our purposes. Let’s collect the arguments into a vector:
Don’t worry if you don’t understand things like iterator or vector, we will learn about these later. Here, we are just using them to get user input. The main goal of this article is for you to understand about variables and types and that’s already done at this point.
fn main() {
    let args: Vec<String> = std::env::args().collect();

    println!("{args:?}");
}
Run:
cargo run -- add 10 20You should see something similar to:
["target/debug/scientific-calculator", "add", "10", "20"]The exact first value will depend on your environment.
The important part is:
"add"
"10"
"20"
These are the arguments that we supplied.
Why There’s a --?
You may have noticed that we’re running the program like this:
cargo run -- add 10 20The -- separates Cargo’s arguments from our program’s arguments. Everything before -- is interpreted by Cargo. Everything after -- is passed to our program.
So:
cargo run -- add 10 20means:
Cargo
  |
  └── run the program
          |
          ├── "add"
          ├── "10"
          └── "20"
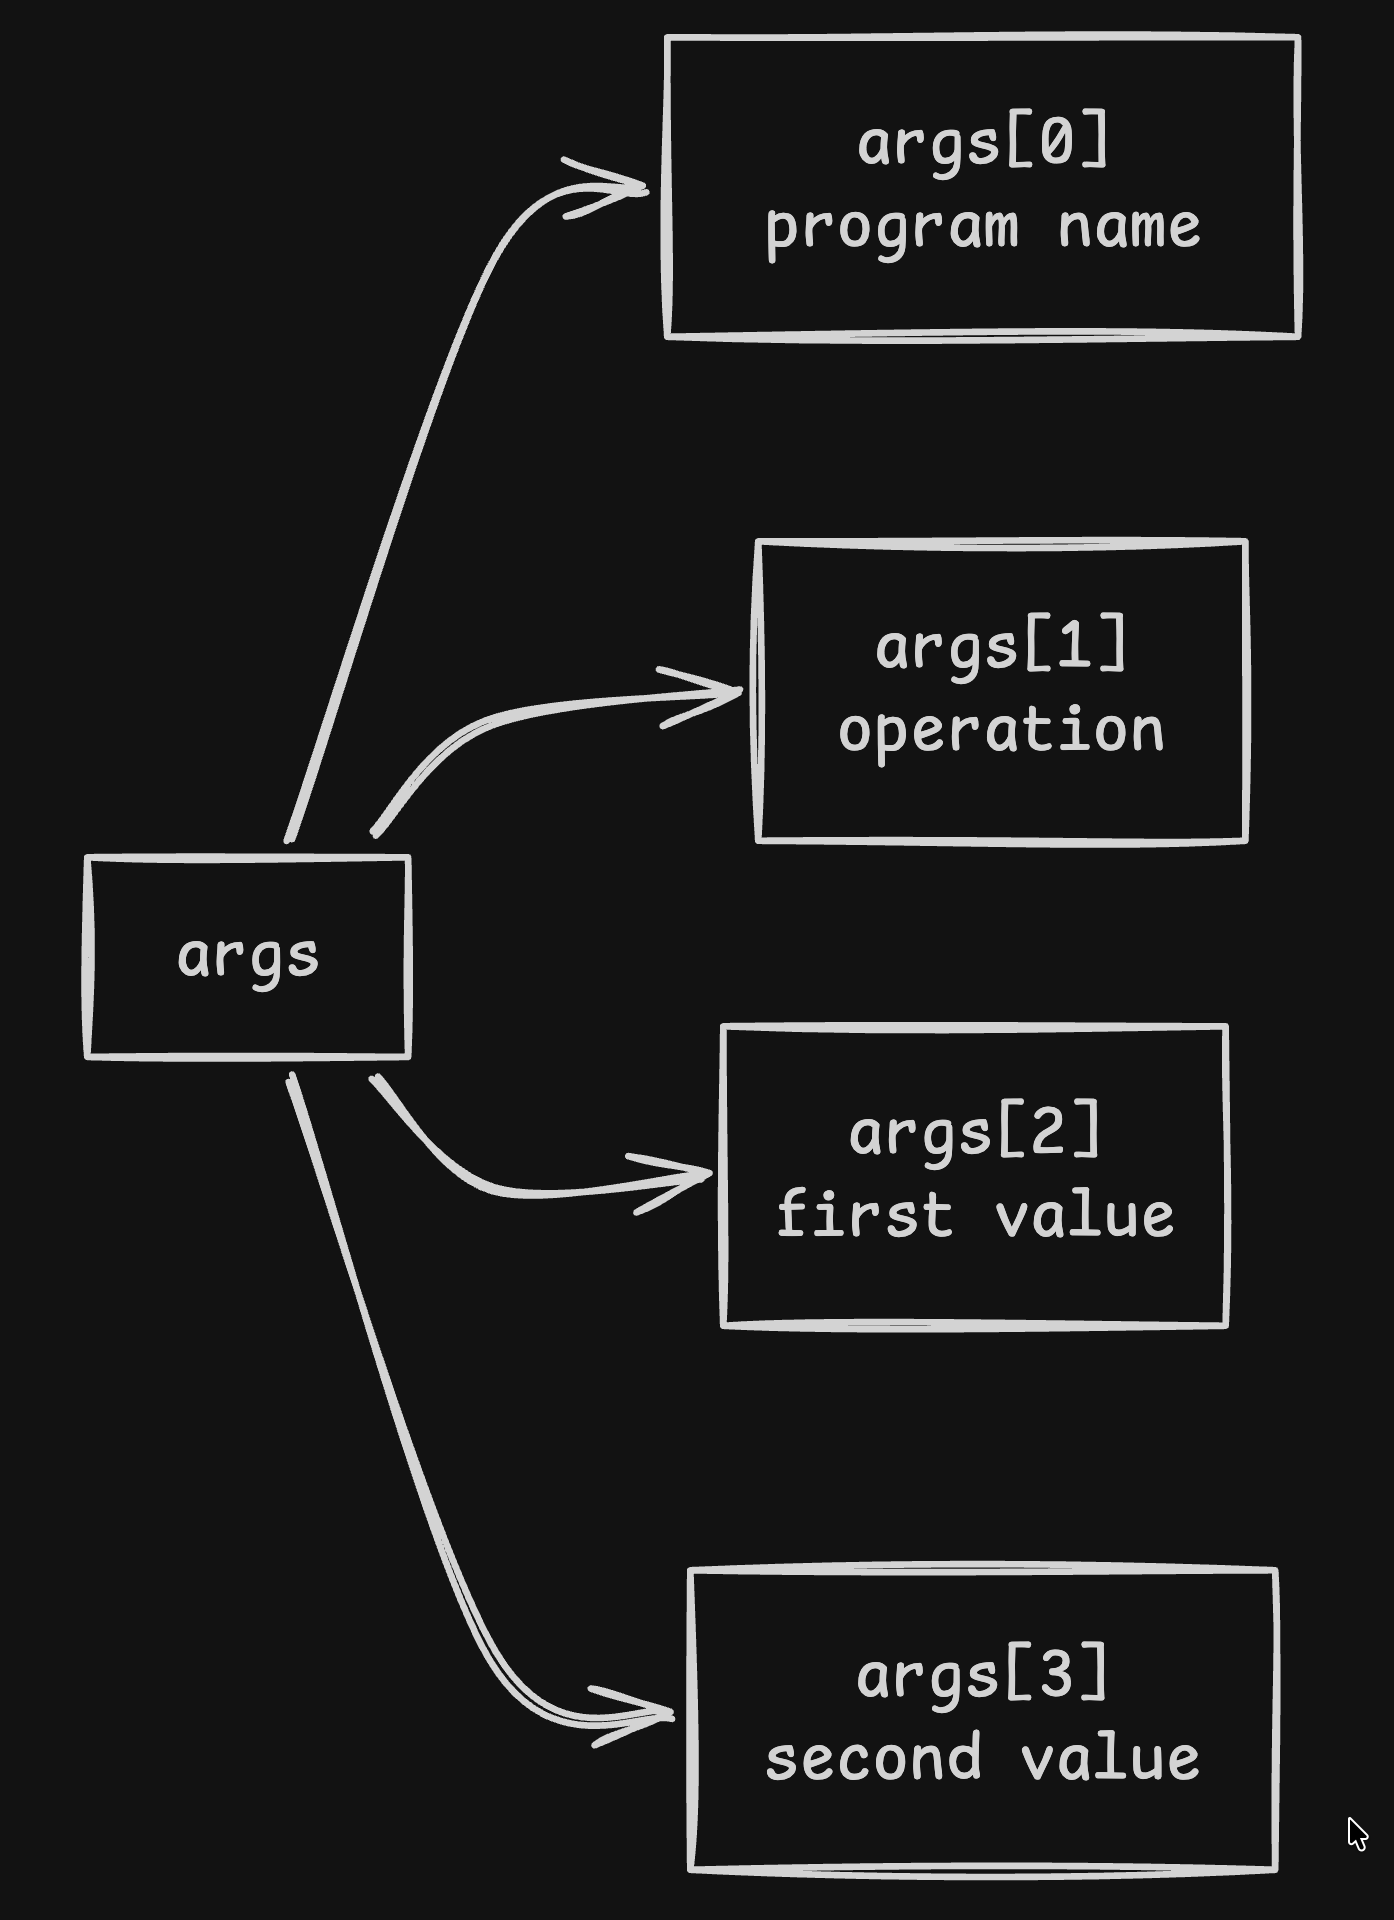
Accessing Individual Arguments
We can access individual elements of the collected arguments using an index.
Change the program to:
fn main() {
    let args: Vec<String> = std::env::args().collect();

    println!("Operation: {}", args[1]);
    println!("First value: {}", args[2]);
    println!("Second value: {}", args[3]);
}
Run:
cargo run -- add 10 20You should get:
Operation: add
First value: 10
Second value: 20
Why do we start at
args[1]instead ofargs[0]? Because the first argument,args[0], is the program’s executable name or path.
Parsing the numbers
We are able to get the operation that user wants to perform and the values but the problem is the values are coming as string from command line, we need to convert them to numbers to perform any mathematical operations. To parse, we can do something like this:
fn main() {
    let args: Vec<String> = std::env::args().collect();

    let a = args[2].parse::<f64>().unwrap();
    let b = args[3].parse::<f64>().unwrap();

    let result = a + b;

    println!("{result}");
}
Run it and you should see 30 as output. Now the remaining work we need to do is bring back those operations that we commented out previously and use conditions to choose which operation to perform.
Choosing the Operation
Till now, we can get the operation that user wants to execute and the values in floating-point type. We are going to use conditionals in Rust, I’m not going to dive deep into conditions right now but we will use basic if-else block in this project so no need to worry.
fn main() {
    let args: Vec<String> = std::env::args().collect();

    let operation = &args[1];

    if operation == "add" {
        let a = args[2].parse::<f64>().unwrap();
        let b = args[3].parse::<f64>().unwrap();

        println!("{}", a + b);
    } else if operation == "subtract" {
        let a = args[2].parse::<f64>().unwrap();
        let b = args[3].parse::<f64>().unwrap();

        println!("{}", a - b);
    } else if operation == "multiply" {
        let a = args[2].parse::<f64>().unwrap();
        let b = args[3].parse::<f64>().unwrap();

        println!("{}", a * b);
    } else if operation == "divide" {
        let a = args[2].parse::<f64>().unwrap();
        let b = args[3].parse::<f64>().unwrap();

        println!("{}", a / b);
    } else if operation == "sqrt" {
        let value = args[2].parse::<f64>().unwrap();

        println!("{}", value.sqrt());
    } else if operation == "pow" {
	    let base = args[2].parse::<f64>().unwrap();
	    let exponent = args[3].parse::<i32>().unwrap();

	    println!("{}", base.powi(exponent));
    } else if operation == "sin" {
        let value = args[2].parse::<f64>().unwrap();

        println!("{}", value.sin());
    } else if operation == "cos" {
        let value = args[2].parse::<f64>().unwrap();

        println!("{}", value.cos());
    } else {
        println!("Unknown operation: {operation}");
    }
}
Ok, this seems a lot of lines of code but we are only using a lot of if-else blocks, that’s all. Its very similar to other languages, so I’m not explaining anything. But to summarise, we are receiving the operation that user wants to execute, then we use a bunch of if-else blocks to check which block satisfies the operation and then in that block, we are reading the values from command line and performing the operation and printing the result.
We are reading values inside every block so that we can simply decide which operation requires how many values for example square root requires only one value but addition requires two
Now test them:
cargo run -- sqrt 255cargo run -- sin 00cargo run -- cos 01There you go, we just finished building our mini scientific calculator in Rust. If you want to experiment further, try adding a few more operations yourself. You could add tan, log, or anything else you think would be useful.
And if you’re following along and build the calculator yourself or make any interesting modifications, feel free to tag me on X. I’d love to see what you build and will repost most of them as a small gesture of appreciation for following along with the series.
In the next article, we’ll learn about control flow in Rust by building a number guessing game. See you in the next one.